Saturday 24 August 2013

How to Make Perfect Macaroons…(Gluten free)

Macaroons – The French type, are notoriously tricky little blighters and reduce lots of us to tears. But they don't have to be this hard. I have made this recipe many times with out fail. The ones i have made below are vanilla macarons with a blueberry icing made with 'fresh as' fruit powders. I don't know how you explain what a macaron is really, they are a sweet treat that my friends and family love and often make for birthdays, dinner party's and just because. However i am not so much a fan, i cant identify what is it i don't like, yet they are gluten free as always! Enjoy the recipe...
Ingredients:
110g egg whites (whites from approx 3 large eggs)

75g caster sugar
125g ground almonds 

175g icing sugar
Measure out the ground almonds and icing sugar and put them into the food processor.
Measure out the egg whites. Egg whites are measured in grams seems a bit silly to me as surely you measure them in ml’s as a liquid but hey, 110g egg whites = 110ml egg whites.
Place them into a large bowl and whisk like you would a meringue.  As the mixture comes to soft peaks begin adding the caster sugar a third at a time until it’s all worked in and smooth and glossy.
You don’t need to whisk the egg whites to stiff peaks but they should be thick and glossy.
One of the wonderful things about macaroons are their fab colours – whatever takes your fancy.  Using gel paste colours is the best way to colour the mixture without changing the consistency.
Add a small amount of colouring to the meringue and mix in well.
Now you can turn off the Food Processor. Sift into the meringue mixture half of the almond/icing sugar from the food processor.old into the mixture using a spatula or metal spoon until it’s fully mixed in. Sift in the final half. The residue left in the sieve can be very grainy and hard so don’t force it through the sieve just discard it.Fold in as before.
Now comes the tricky part,  you need to keep folding the mixture until it goes smooth and glossy.  By my reckoning this takes 1-2 minutes folding in a figure of 8.  This loosens the mixture until it is the right consistency.  You really don’t want to knock ten tons of air out of it but achieveing the right point is important.
Hold your spatula above the bowl.  The mixture should run from it in a smooth ribbon.  If it’s jerky and breaking then it isn’t right yet.  Just watch out though you want to stop right at this point and go no further, otherwise you’ll have hugely spreading macaroons.
Now we’re ready to go.
Add the mixture to a piping bag fitted with a plain wide round nozzle.
Prepare two baking sheets lined with baking paper. Pipe the macaroons onto the tray in small circles.  To begin with they will have a small peak on the top.  If you have the correct consistency that will soon flatten and you will have a tray full of perfectly smooth macaroons.

Now you need to set the trays aside for 30 minutes.  After this time they should have formed a slight ‘skin’ and you should be able to touch them with your fingertip.
Preheat the oven to 140c Fan/160c/Gas Mark 3.
Place the trays in the oven for 13 minutes.
Remove from the oven and allow to cool, still on the tray.  Good macaroons should be smooth and glossy with a good foot and not flat.  I have added some trouble shooting tips at the end of the post.
Sandwich together with a buttercream or ganache of your choice. 

Fluffy Vanilla frosting: Makes 2 cups of frosting

4 cups icing suagr 
100g softened butter 1/
4 c milk 
1 T vanilla 
Method: Cream the butter for 3-4 minutes or until very pale. Add milk and vanilla and half of the icing sugar mixture, beat for at least 1 minutes or until the mixture is light and fluffy. Add remaining icing sugar and beat for a further 3 minutes or until the mixture is light and fluffy or at a spreadable 
consistency.

Can add colour or flavouring such as fruit powder to the icing for flavour like i have in the ones below


Sunday 18 August 2013

Nutella Filled Chocolate Cupcakes with Toasted Hazelnuts - GLUTEN FREE

With gluten free cupcakes, adding a filling brings more attention to the filling itself rather than the muffin which can sometimes have a different taste to regular baking. I have found a recipe which most people cant even tell is gluten free which is seen below and works fine with regular flour too. I am a huge fan of nutella and there is nothing better than biting into a light and fluffy cupcake with nutella all through the middle.. YUM


Chocolate cupcakes:
Makes 24 big cupcakes and 24 small cupcakes

3 cups gluten free flour (Healtheries baking mix)

2 t baking soda
1 t baking powder
1/2 t salt
3 T instant coffee
1 cup hot water
1 cup cocoa
1 cup cold water
200g softened butter
2 1/2 cup caster sugar
4 eggs
1 T vanilla

Method:
Preheat the oven to 170'c and line two 12-hole muffin trays with cupcake papers.

In the bowl of your electric mixer cream the butter for 2 minutes. Add the castor sugar a third at a time, beating for 2 minutes after each addition. Beat until the mixture is light and fluffy and sugar had almost dissolved. Add eggs one at a time, beating for 1 minute between each. Add vanilla extract.
Sift together the four, baking soda, baking powder and salt. In a separate bowl whisk together the coffee, hot water and cocoa until you have a smooth paste. Add the cold water and mix until evenly combined. Add a quater of the flour to the creamed mixture and beat on a low speed until combined. 
Add a third of the cocoa mixture and beat until combined. Repeat this process twice more. Add the reaming quarter of flour and beat until thoroughly combined. Do not over beat or it will toughen the mixture.
Spoon mixture into cupcake papers, filling each about 3/4's full. Bake for 15-18mins. Removes cupcakes from tray and cool for at least 30mins before icing.
Once cupcakes are cooled, use a knife to gently core out the centre. Fill a piping bag with about 2 heaped spoons from the nutella jar and fill the cupcakes.

Fluffy Vanilla frosting:
Makes 4 cups of frosting - enough for 24 cupcakes
8 cups icing suagr
200g softened butter
1/3 c milk
1 T vanilla

Method: Cream the butter for 3-4 minutes or until very pale. Add milk and vanilla and half of the icing sugar mixture, beat for at least 1 minutes or until the mixture is light and fluffy. Add remaining icing sugar and beat for a further 3 minutes or until the mixture is light and fluffy or at a spreadable consistency.
Take about 100g of hazelnuts and chop into small pieces. Lightly dry roast until a brown, be careful not to burn. Leave a side to cool. 
Pipe on icing, sprinkle over the cupcakes and great a small amount of chocolate over the top and ENJOY


Monday 12 August 2013

Fudge Brownie, Cookie Dough Vanilla Sponge Cake

Chocolate Fudge Brownie, Cookie Dough Vanilla Sponge Cake
This was the cake i made yesterday for one of the best friend Sharon's birthday! It is the mother of all cakes and diabetes on a plate! I started with three vanilla sponge cakes, filled with one layer of cookie dough icing and one of vanilla frosting. Covered in the cookie dough butter cream and topped with fudge brownie and chocolate sauce!!
Start with the brownie as this can be made a day in advance and may take the longest time to set, cool and be ready to cut.
Chocolate Fudge Brownie:

Ingredients

150g Butter
1 Cup Cocoa
4 Eggs
420g (2 Cups) Chelsea White Sugar
1 tsp black strong Coffee
3/4 Cup Plain Flour
1 tsp Baking Powder
¾ bar (200g) of a Whittakers Raspberry White Chocolate Bar

Method

Preheat oven to 160c.
Melt butter & cocoa together in saucepan and cool.
Mix together in bowl everything but the chocolate and raspberries. Add butter & Cocoa mix. Fold to combine.
Break up the White choc into bits and add to mix. Pour into prepared dish (20cmx20cm roughly).
Bake for 40 mins or until skewer comes out clean. (can sometimes take up to 60mins depending on your oven, so keep checking after 40mins)
Cool on rack, best to wait over night and cut into small sqaures.

The perfect vanilla cake: (Works with gluten free all purpose flour)
185g unsalted butter, softened
1 teaspoon of vanilla paste
1 1/4 cups (275g) caster sugar
3 eggs
1/3 cup (80ml) milk
1 1/2 (225g) self-raising flour
1/3 (50g) cornflour

Preheat oven to 180 degrees and grease the tin of 2-3 cake pans (depending on how many layers you want)
In the bowl of a mixmaster add all the ingredients and beat on low until combined. Increase speed to medium and beat for a further 3 minutes or until the batter is fluffy and pale in colour. Spread mixture into the pans (I baked 3 separate cakes) and bake for 12-15mins.
Stand for 5 minutes before turning out onto a wire rack to cool completely.


Vanilla buttercream:
100g butter, softened 
4 cups Icing sugar
2 tsp Vanilla
1/4 cup milk

Beat butter in electric mixer until pale. Add milk, vanilla and half of the icing sugar and mix on a slow speed to combine. Add remaining icing sugar and beat until thick and creamy, about 2-3mins. You may need more milk or icing sugar to get the texture you need. Use this as a crumb coat once the cake is iced and also in one of the layers between the cake.


For the cookie dough buttercream:
250g (about 2 1/4 sticks) butter, at room temperature
2/3 cup light brown sugar, packed
2 1/2 cups (about 315g) icing/confectioners' sugar, sifted
2/3 cup (about 85g) all-purpose flour
1/2 tsp. salt
2 tbsp milk
2 tsp vanilla extract
200g (about 1 cup) mini chocolate chips or finely chopped pieces of milk chocolate

Prepare the buttercream; beat together the butter and brown sugar in a large mixing bowl with an electric mixer on high. Mix in the icing sugar until smooth. Beat in the flour and salt. Mix in the milk and vanilla extract until smooth and well blended. add any of the remaining icing from above and stir in chocolate chips until evenly mixed. Place one cake layer on a cake stand and cover the top of the cake with a layer of the buttercream, smoothing with an offset spatula. Sandwich second cake layer on top (i did the second layer with vanilla buter cream as above and had 3 layers of vanilla sponge). Cover entire cake with the vanilla butter cream as a crumb coat, leave to set (in the fridge about 30mins-1hour) then use the the remaining cookie dough buttercream to cover the rest of the cake, smoothing with the offset spatula. 


Cut brownies into small squares and pile on top of cake (you don't have to use all of them). 
Melt 100g chocolate and drizzle over the top of the brownie pile or use a chocolate sauce or ganache or a richer taste


Friday 2 August 2013

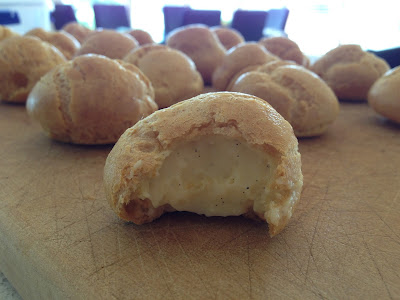
Gluten-free Cream Puffs (Profiteroles)

Before i found my allergy to gluten i was in love with the frozen cream puffs you buy from the supermarket! Sadly now no one makes gluten free versions however this gave me the exciting task of making them for myself and i was pleasantly surprised at how easy they were and how well they turned out for my first time making them!


Gluten-Free Cream Puffs


Adapted from Martha Stewart’s Cooking School

Makes approx 3 dozen puffs
For Pâte à Choux 


1 cup + 2 tsp water

1/2 cup unsalted butter
1 tsp granulated sugar
1/2 tsp salt
1 cup gluten-free all purpose flour
5 large eggs

For the cream puffs


1 recipe pastry cream (follows)

1/3 cup heavy cream
1 egg+ 1 Tbsp water
cooking spray 

Preheat the oven to 200°c with a rack in the center position and line 2 baking sheets with baking paper. 
To make the pâte à choux: Combine 1 cup of water, butter, sugar, and salt in a medium saucepan over medium-high heat. Bring the mixture to a boil, and immediately remove from the heat. Use a wooden spoon to stir in the flour, when it is completely incorporated return to the heat. 
Dry the mixture by stirring constantly over heat until it pulls away from the sides and the liquid has cooked out, about 4 minutes. (I literally had a puddle of water in the bottom of my pan that was separated from the ball of dough. At this point it is supposed to look like a big blob, appetizing, right?)
Transfer the mixture to the bowl of an electric mixer with the paddle attachment, and mix on low speed for a few minutes to cool slightly. 
Add 5 eggs, one at a time mixing until each addition is incorporated.
 Once all of the eggs are incorporated you can test the batter by touching it with your finger or a rubber spatula, if a sticky ribbon forms when you pull away the batter is perfect. If not, add the extra 2 teaspoons of water one at a time, mix thoroughly and test again after each addition. You are looking for a batter that is smooth and shiny and creates a sticky ribbon. If your batter at this point is still not creating a sticky ribbon you can add water a 1/2 teaspoon at a time until it does.

Fill a pastry bag fitted with a plain round 3/4-inch tip with the pâte à choux, and pipe 1 1/2 inch rounds onto the prepared baking sheets using your flour circles as guides. Beat together the remaining egg and tablespoon of water; use your finger to rub the egg mixture over the cream puff, smoothing the ridges and flattening the tip.

Cover one baking sheet with lightly oiled plastic wrap and place in the fridge. Bake the remaining sheet pan in the oven at 200°c for 15 minutes; reduce heat to 180°c and bake for an additional 15-20 minutes, or until the puffs are golden brown. Transfer to a rack to cool completely. Return the oven to 200°c and repeat the baking process with the second sheet pan.

Pastry Cream:
2 cups whole milk
1/2 cup sugar
1 vanilla bean, halved lengthwise and scraped
pinch of salt
3 large egg yolks
3 Tbsp. plus 1 1/2 tsp. cornstarch
2 Tbsp. unsalted butter, cut into small pieces


Bring milk, 1/4 cup of sugar, vanilla seeds, and salt to a simmer in a saucepan over medium heat, whisking to disperse seeds.
Whisk the egg yolks and remaining 1/4 cup sugar in a medium bowl. Whisk in the cornstarch, 1 tablespoon at a time. Ladle a 1/2 cup hot milk mixture into the yolk mixture, whisking constantly to temper the eggs. Add the remaining milk mixture 1/2 cup at a time whisking constantly. When the milk and eggs are completely incorporated return all of the mixture to the saucepan and heat over medium-high heat, whisking constantly, until the mixture comes to a full boil and is thick enough to hold its shape when lifted with a spoon, about 2 minutes. Remove from heat and stir in the butter. *Think warm vanilla pudding consistency.
Transfer the mixture to a bowl and place plastic wrap directly onto the surface to prevent a skin from forming and refrigerate until cold. Pastry cream will keep for a few days in the refrigerator.


To fill and finish; whip heavy cream to medium peaks in a small bowl, stir pastry cream to soften and add the whipped cream to the pastry cream in two batches, folding to combine. Fill a pastry bag fitted with a plain round tip with the pastry cream mixture. Insert the tip into the bottom of each puff, and fill. Wipe of any excess cream that overflows from the bottom of the puff and serve immediately. These puffs will keep for a few days in the refrigerator tightly wrapped.


For those who love chocolate (this should be everyone) Melt 200g of dark chocolate over a double boiler. Leave to sit and cool, and drizzle over cream puffs


'


I have made these to submit t to Aspiring Bakers #34: Choux Party (August 2013) hosted by Jasline of Foodie Baker - See more at: http://www.foodiebaker.com/2013/08/aspiring-bakers-34-choux-party.html#sthash.1QgIB9FM.dpuf Cheek out the link!!